A candidate accepts your offer on Thursday. By Monday morning, payroll still needs a form, the laptop has no assigned owner, and the new employee cannot access the calendar. Everyone thought someone else had handled it.
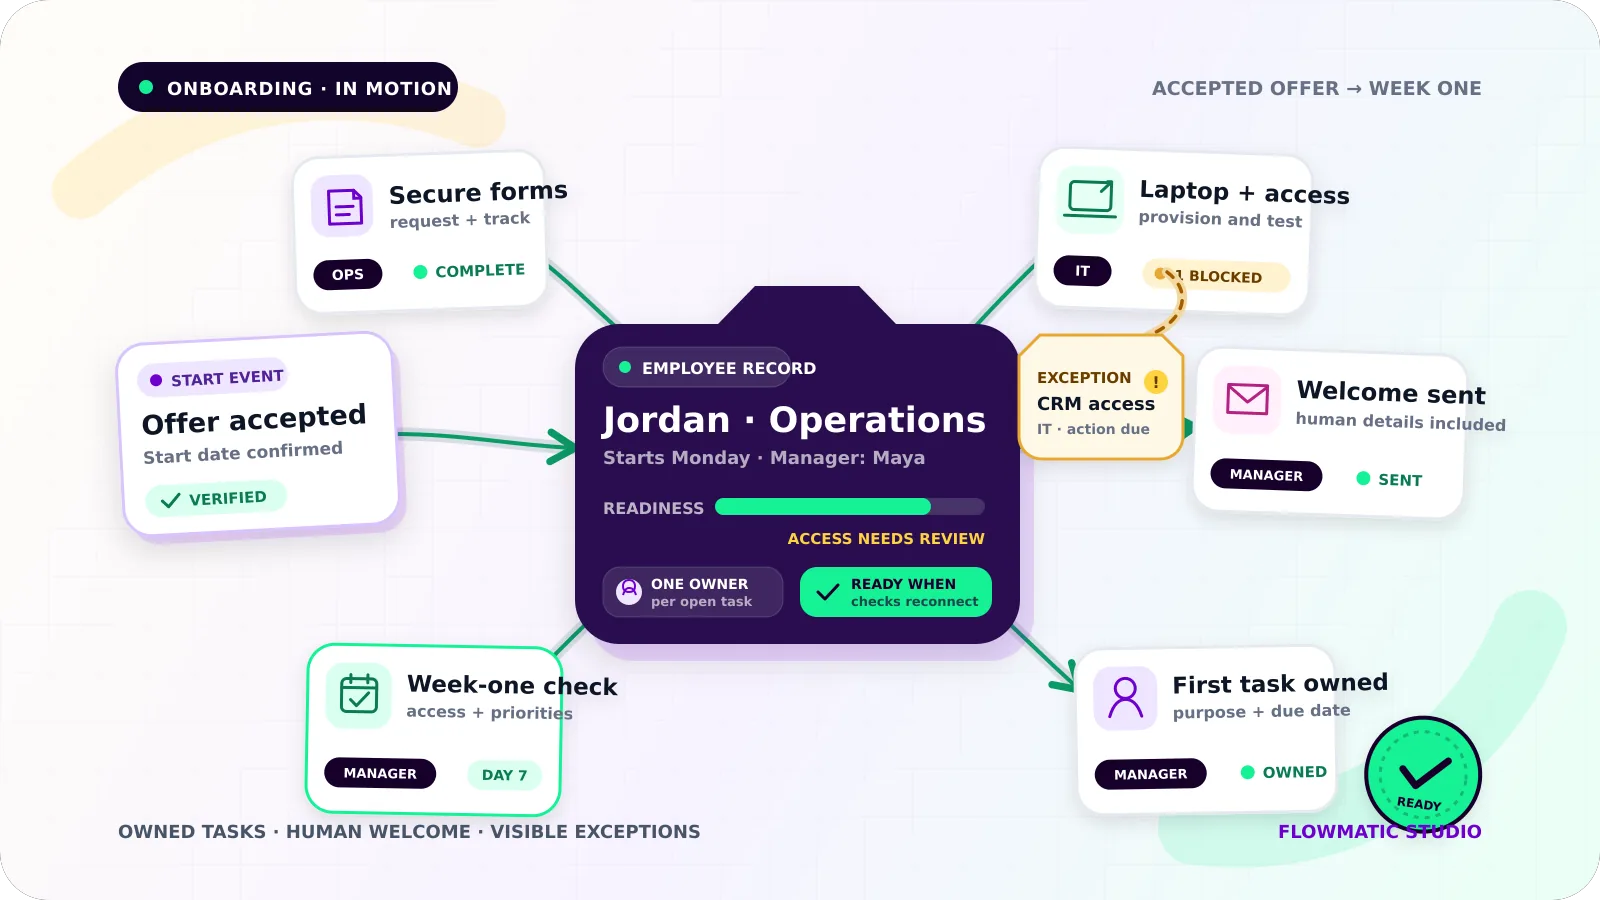
Employee onboarding automation should prevent that kind of gap. For a small team, the goal is not to replace the manager or turn a welcome into a sequence of robotic messages. It is to turn an accepted offer into a visible set of owned tasks, timed communications, and checks that confirm the employee is ready to work.
Start with a verified hiring event
Choose one event that starts the workflow. A useful trigger is an accepted offer recorded by the person responsible for hiring. Do not rely on an email subject line alone, and do not create accounts while terms or the start date are still being discussed.
The hiring record should hold the employee's contact details, role, manager, location, confirmed start date, equipment and approved access needs, plus task owners and deadlines. Keep sensitive details in the appropriate HR or payroll system. A shared tracker can show that a form is complete without copying bank, tax, identity, or medical information into a project board.
Build one template with named owners
Create a role-based checklist instead of rebuilding onboarding from memory. Keep common steps in one template, then add approved variations for remote staff, locations, or specialist access.
Every task needs one accountable person and a deadline relative to the start date. “IT” or “management” is not ownership. Name who confirms the hire, requests forms, prepares equipment, provisions accounts, plans the first week, and handles day-one questions. Add a fallback for each critical area so an absence does not stop the checklist.
Connect the workflow in six stages
1. Create the onboarding record
When the offer is marked accepted, create one onboarding record with a unique ID. Copy approved fields, generate the checklist from the role and start date, then notify each task owner. Missing information or a short lead time should set Needs review, name an owner, and show what is missing.
2. Request forms safely
Send one clear message explaining the required forms, secure completion route, contact person, and due date. Track Not requested, Sent, Received, Needs correction, and Complete. Reminders should list only open items and stop when the state changes.
3. Prepare accounts and equipment
Start account work from an approved role-access list. Record each system, access level, approver, owner, deadline, and whether access is requested, approved, provisioned, tested, or blocked. Track equipment, delivery, and testing the same way. “Laptop ordered” is not “ready.”
A project board or automation platform can create routine tasks, while an authorized administrator still provisions Google Workspace, Microsoft 365, or other accounts. Automation coordinates approval and status; it should not bypass access controls.
4. Schedule the human welcome
Once the manager confirms the plan, send arrival or login details, start time, manager contact, and first-meeting information. Schedule the manager welcome, essential introductions, required training, and end-of-week check-in. Give each meeting an owner and purpose; automation provides structure, not the conversation.
5. Run a day-one readiness check
Before the start, re-read the live record. Confirm forms, tested equipment and essential access, booked meetings, and a prepared first task. Send blocked items to their owners. Successful automation runs do not prove the employee is ready.
6. Close the first-week loop
On day one, ask the employee to confirm access and equipment. At week's end, prompt the manager to review access problems, training, role questions, and next priorities. Close onboarding only when the agreed criteria are confirmed, and leave unresolved items as owned tasks.
Make failures visible and recoverable
A reliable workflow needs an exception queue for incomplete forms, rejected submissions, failed messages, unapproved access, account errors, delayed equipment, changed start dates, and tasks without an owner.
Each exception should show the record, failed stage, owner, failure time, latest attempt, and next action. Retries should continue from recorded state instead of recreating tasks or messages.
For a changed start date, recalculate future deadlines while preserving completed work and flagging anything now invalid. For a cancelled hire, stop pending messages and account requests, notify owners, and follow the approved data-handling process.
Test the workflow before using it
Run a test employee through the process without using real sensitive data. Check a normal hire and cases where:
- a required field is missing
- a form needs correction
- an owner is away
- account approval is delayed
- equipment delivery fails
- the start date changes
- the same accepted-offer event arrives twice
- a notification fails after tasks were created
- the hire is cancelled before day one
For every case, confirm there is no duplicate onboarding record, every open item has one owner, failed work stays visible, reminders stop when resolved, and the manager can see what must happen next.
Begin with one role and the smallest repeatable checklist. Add role-specific branches only after the team trusts the statuses, ownership, and exception path. For the broader design principles, read Flowmatic's guide to small-business workflow automation. For the adjacent post-sale process, compare the client onboarding automation workflow.
If employee onboarding still depends on inbox searches and last-minute chasing, request a Flowmatic workflow audit. We will map the accepted-offer trigger, owners, access approvals, messages, checkpoints, and failure path before recommending a build.
Make every new-hire handoff visible
Map an onboarding workflow your team can trust
Flowmatic can map your accepted-offer trigger, owners, access approvals, messages, checkpoints, and exception path before recommending a build.
Request a workflow audit